Removing car decals without damaging paint is where most DIY methods fail.
You’ve probably seen advice like:
👉 “Just heat it and peel it off”
If you’re dealing with small stickers, check our guide on how to remove stickers from car
But after removing old, cracked, and sun-baked decals across various vehicles in Melbourne, the reality is:
❌ Wrong technique = damaged paint
❌ Wrong tools = permanent marks
❌ Rushing the job = costly repairs
Here’s the professional method we use to remove decals safely without damaging your vehicle — see our car sticker removal guide
Why Car Decals Are Harder to Remove Than Stickers
Many people confuse stickers and decals — but they are completely different.
Stickers:
- Smaller
- Weaker adhesive
- Easier to remove
Decals / Signage:
- Strong adhesive
- Cover large panels
- Often exposed to sun for years
👉 Over time, decals bond strongly to paint, making removal much more risky.
Why Removing Decals Can Damage Paint
From real jobs, these are the biggest issues:
- UV exposure causes paint fading under decals
- Adhesive hardens and sticks deeper into clear coat
- Paint becomes uneven after removal
👉 If done incorrectly, decal removal can:
- Peel clear coat
- Leave visible “ghost marks”
- Damage resale value
Tools Required for Safe Decal Removal
From real professional work:
- Heat gun (controlled heat only)
- Adhesive remover (De-Solv-It / 3M)
- Plastic scraper (never metal)
- Clay bar
- Machine polisher (Scholl’s compound)
- Eraser wheel (used carefully)
👉 Using the wrong tool (especially steel blades) is the biggest cause of damage.
Step-by-Step Method (Professional Process)
Step 1: Controlled Heat Application
We apply heat evenly to soften adhesive without burning paint.
Step 2: Section-by-Section Removal
Decals are removed slowly — never pulled all at once.
Step 3: Adhesive Breakdown
Professional adhesive removers dissolve glue safely.
Step 4: Surface Decontamination
Clay bar removes any leftover residue.
Step 5: Machine Polishing
Restores paint, removes marks, and evens out finish.
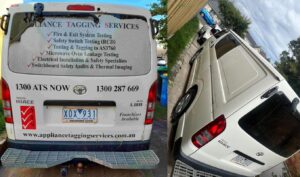
H2: Real Case Study – What Happens When Decal Removal Goes Wrong
One of our recent jobs in Melbourne shows exactly why decal removal should be handled carefully.
A business owner asked his staff to remove old signage from a company van. The decals looked simple, so they assumed it would be an easy job.
Instead of using proper tools, they used a steel blade directly on the paint.
🚨 What happened:
- The decal came off — but so did the paint and clear coat
- Large sections of the bonnet were completely stripped
- Deep scratches were left across the panel
- Adhesive residue remained on other areas
🔧 When we were called:
We had to step in and manage the situation carefully:
- Removed remaining decals using controlled heat
- Broke down heavy adhesive using professional products
- Prevented further damage to weakened paint
- Machine polished surrounding areas to improve appearance
⚠️ Final result:
While we improved the condition significantly, the paint damage caused earlier could not be fully fixed.
👉 The vehicle required repainting for a perfect finish.
💡 Key takeaway:
👉 A simple decal removal job turned into a costly repair due to improper tools and technique.
Special Cases (From Real Work)
🔥 Old Decals (10+ Years)
- Cracked and baked into paint
- Extremely time-consuming
- One job took 2 people nearly 1 week
⚠️ Plastic Trims (High Risk)
- Heat can burn or warp plastic
- Requires very controlled technique
Should You Use an Eraser Wheel?
We use eraser wheels professionally, but:
⚠️ Can leave yellow marks
⚠️ Marks may not always be removable
👉 Not recommended for DIY users
How Long Does It Take?
- Small decals: 2–4 hours
- Full signage removal: ~8 hours
- Wrap removal: 12–14+ hours
DIY vs Professional Removal
DIY Risks:
❌ Paint damage
❌ Uneven finish
❌ Glue stains
Professional Benefits:
✔ Safe removal
✔ Polished finish
✔ Maintains resale value
👉 For business vehicles, professional removal is recommended —
you can also claim it as a tax expens
Professional Car Decal Removal in Melbourne
We provide:
✔ Mobile service across Melbourne
✔ Same-day bookings
✔ Safe decal removal
✔ Paint correction included
✔ Ceramic coating available after removal
👉 Need help? Check our car signage removal Melbourne
❓ FAQ SECTION
H2: Frequently Asked Questions
Q: How do you remove car decals without damaging paint?
Use controlled heat, plastic tools, and adhesive remover, followed by polishing.
Q: Can removing decals damage paint?
Yes, especially if decals are old or removed incorrectly.
Q: What is the safest way to remove decals?
Professional removal using proper tools and controlled techniques.
Q: How long does decal removal take?
2–4 hours for small jobs and up to 8+ hours for large signage.
Q: Should I remove decals myself or hire a professional?
DIY works for small decals, but large or old decals should be handled professionally.