Finding mould inside your car can be alarming. It may appear as white, green, grey or black spots across the seats, carpets, seat belts or interior plastics. You may also notice a strong musty smell as soon as you open the doors.
The visible mould is often only part of the problem.
In many cases, moisture has already travelled underneath the seats or into the carpet underlay. Cleaning the surface without finding and repairing the water source may only give you a temporary result.
At TED Car Detailing, we have been treating mould-affected car interiors across Melbourne for around four to five years. During that time, we have completed approximately 300 to 400mould-removal jobs involving sedans, SUVs and a smaller number of utes.
We have worked on mildly affected interiors as well as vehicles where the seats, carpets and almost every visible surface were covered in mould.
This guide explains what causes mould inside a vehicle, what you can safely do yourself, the mistakes to avoid and when professional treatment may be the better option.
What Causes Mould Inside a Car?
Mould grows when moisture remains trapped inside a closed vehicle.
Based on the jobs we have completed, the most common cause is water entering through the roof, sunroof, windscreen or another body seal.
From our own job history, we estimate that:
- Around 80% of cases involved a roof or body leak
- Around 10% involved a window being left open during rain
- Around 5% involved rainwater entering another way
- Around 5% involved a blocked air-conditioning drainpipe
These percentages are based on the vehicles we have personally treated. They are not general industry statistics.
Roof leaks are especially difficult because water does not always appear directly underneath the damaged area. It can travel behind the roof lining, plastic trims or door pillars before reaching the floor.
This means you may find a wet rear carpet even though the leak started near the front windscreen or sunroof.
Other common causes include:
- Damaged door seals
- Blocked sunroof drainage channels
- Windscreen leaks
- Wet floor mats
- Damp clothes or towels left inside
- Water collecting in the boot
- A blocked air-conditioning drain
- A vehicle being left unused while damp
A small amount of water can create a major problem when the doors remain closed and the vehicle receives little airflow.
Where Mould Usually Hides
When we arrive at a mould-removal job, we inspect the entire interior.
We do not only look at the section shown in the customer’s photos. Mould and moisture are often hiding in areas that are difficult to see.
The most common problem areas include:
- Underneath the front and rear seats
- Carpet underlay
- Seat rails
- Seat stitching
- Floor mats
- Boot carpet
- Spare-wheel compartment
- Roof lining
- Seat belts
- Door seals
- Areas around the windscreen
In our experience, the carpets are often holding more moisture than the seats.
The top of the carpet may feel almost dry, while the underlay underneath remains wet. In some of our worst jobs, we have extracted approximately three to five litres of water from the carpets and upholstery.
That is why a visual inspection alone is not always enough.
Can You Remove Car Mould Yourself?
A very small amount of surface mould may sometimes be cleaned at home.
DIY cleaning may be reasonable when:
- The affected area is very small
- The source of the leak has already been repaired
- The seat and carpet are completely dry
- There is no strong musty smell
- The mould has not spread underneath the seats
- The roof lining and seat belts are unaffected
However, widespread mould is different.
Many customers contact us after trying vinegar, baking soda, household bleach or general-purpose cleaning products. These methods may remove part of the visible staining, but they do not remove litres of water from underneath the carpet.
They may also create additional problems.
Vinegar can leave a strong smell inside the cabin. Bleach may fade fabric or mark interior plastics. Heavy scrubbing can damage seat fibres, and excessive water can push moisture deeper into the foam.
The biggest DIY mistake is treating the visible mould without repairing the source of the moisture.
If the leak is still active, the mould may return regardless of how much cleaning product is used.
How to Remove a Small Amount of Surface Mould
The following process is only suitable for a small, recent patch of surface mould.
If mould covers several surfaces, the carpets are wet or the smell is strong, skip to the professional-treatment section below.
Step 1 – Find the Moisture Source
Before cleaning, inspect the vehicle for the reason the interior became wet.
Check:
- Roof and sunroof seals
- Door seals
- Windscreen edges
- Floor mats
- Boot area
- Air-conditioning drainage
- Carpet underneath the seats
Do not assume the leak has stopped just because it is not currently raining.
Step 2 – Ventilate the Vehicle
Park the car in a well-ventilated outdoor area.
Open the doors and keep children and pets away while you clean.
Avoid aggressively dry-brushing the mould because this may spread material across the cabin.
Step 3 – Test the Cleaning Product
Use a product that is suitable for the surface being treated.
We use a bleach-free mould-removal product during our professional process, but even a bleach-free product should be tested on a hidden section first.
Car interiors may include:
- Fabric
- Leather
- Vinyl
- Suede-style material
- Painted plastics
- Delicate roof-lining fabric
A product that works on one material may damage another.
Step 4 – Clean Without Soaking the Seat
Apply a controlled amount of cleaner according to the product instructions.
Do not flood the seat. Too much moisture can move deeper into the foam and create another drying problem.
Use clean microfibre cloths and change them regularly instead of spreading residue from one area to another.
Step 5 – Dry the Interior Completely
Drying is just as important as cleaning.
Do not close the vehicle for a long period while the seat or carpet remains damp. Leave it in a safe, ventilated location until the treated area is fully dry.
How We Treat a Heavily Mould-Affected Interior
A major mould-removal job requires more than wiping the seats.
Our process normally includes the following stages.
Full Interior Inspection
We inspect the seats, carpets, roof lining, boot, seat belts, trims and hidden areas underneath the seats.
This helps us understand how far the mould and moisture have spread.
Mould Treatment
A bleach-free mould-removal treatment is applied to suitable affected surfaces.
Different materials require different levels of care. Leather, fabric, roof lining and plastic trims should not all be treated in exactly the same way.
Steam Cleaning
Steam may be used carefully on suitable surfaces as part of the cleaning process.
It can help with fabric, carpets and detailed areas, but it must be controlled. Too much heat or moisture may damage leather, roof-lining adhesive, ageing trims or electronics.
Deep Extraction
Extraction is one of the most important parts of the job.
We extract the fabric seats and carpets to remove as much dirty water and moisture as possible. On severely affected vehicles, several litres of water may be removed.
Full Interior Detail
The complete cabin is cleaned, including:
- Seats
- Carpets
- Floor mats
- Dashboard
- Door trims
- Interior plastics
- Centre console
- Boot area
Treating only the most visible seat would leave the rest of the interior untouched.
Ozone Odour Treatment
After the physical cleaning and extraction are completed, we use ozone treatment to help reduce the remaining musty odour.
Ozone is not a substitute for cleaning and should not be presented as the only treatment. The visible mould and moisture must first be physically addressed.
The vehicle remains unoccupied during treatment and is ventilated afterwards.
Drying
After steam cleaning and extraction, we remove as much water as possible.
Where practical, we schedule major mould-removal jobs during dry or sunny weather and allow the vehicle to dry in a safe, ventilated location.
A larger mould-restoration job normally takes around three to five hours, depending on the vehicle size and condition.
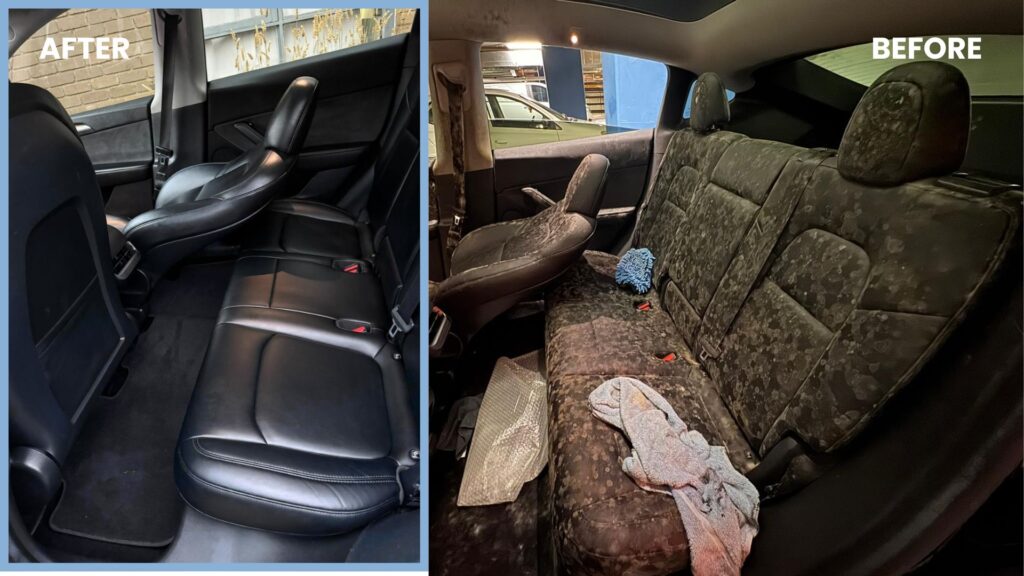
A Real Melbourne Mould-Restoration Job
One of the worst vehicles we treated had been left unused for approximately two weeks while the owner was away.
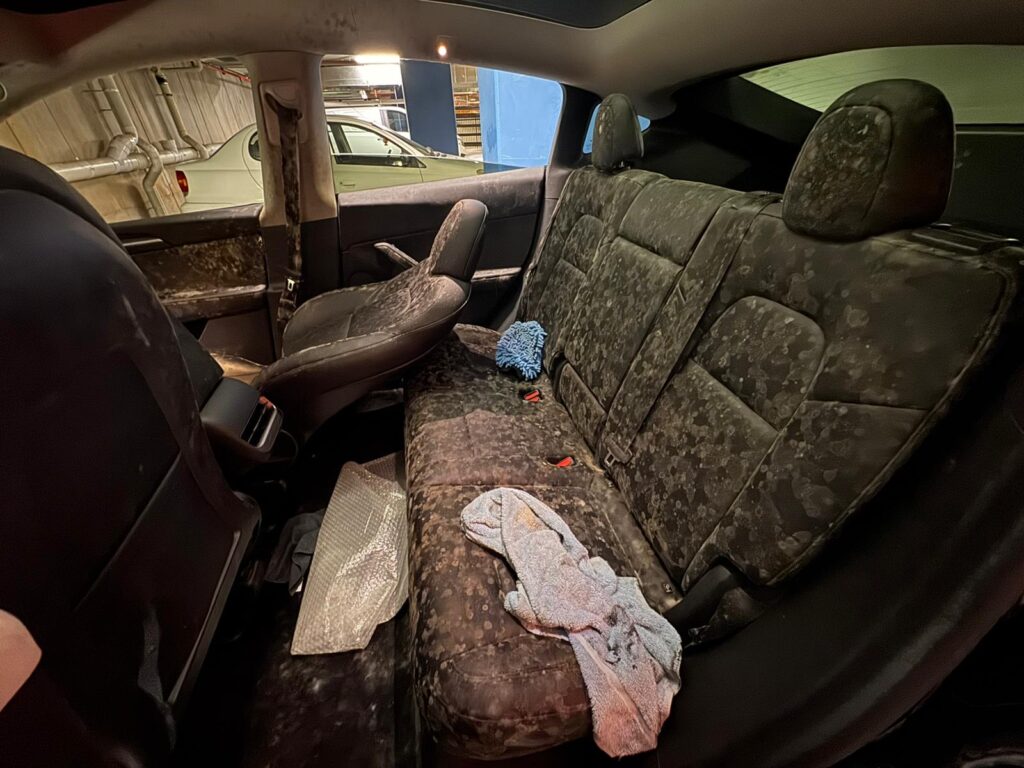
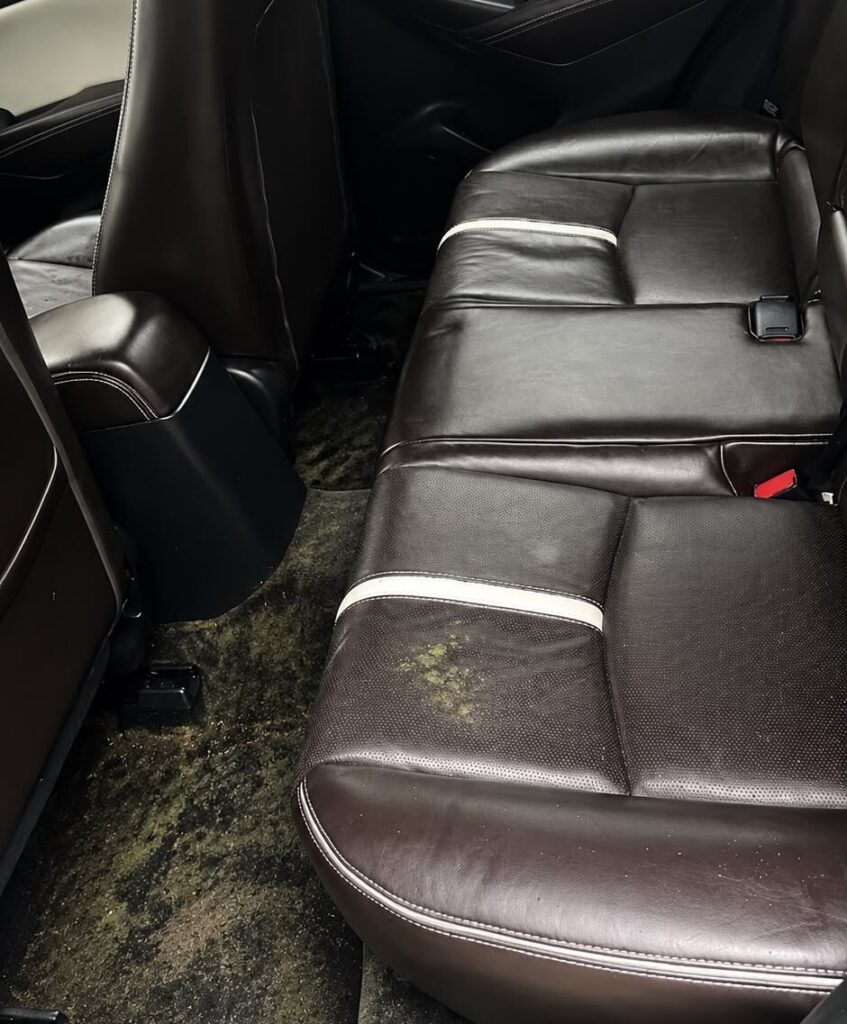
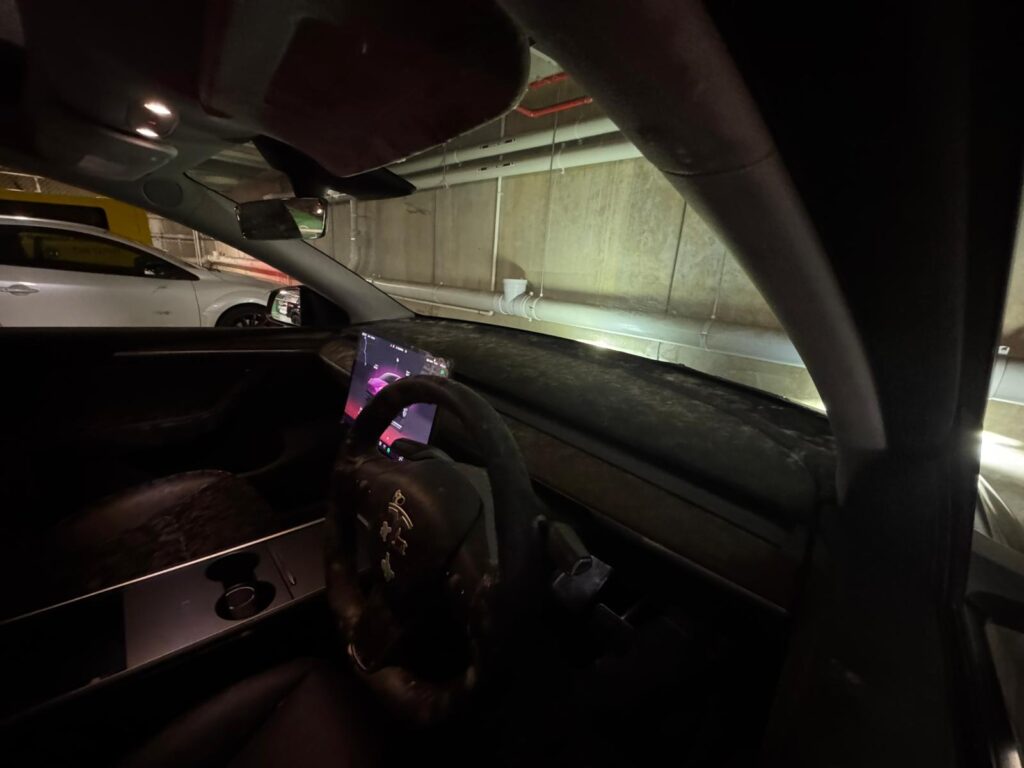
When the customer returned to Melbourne, mould had spread across the seats, carpets and other interior surfaces.
The vehicle was parked in an apartment car park connected to a supermarket. There was no suitable access to electricity at the parking location.
To begin the job, we rented a generator and cleaned enough of the driver’s area to move the vehicle safely. We then took it to our garage, where we could complete the full restoration.
The job included:
- A complete interior inspection
- Mould treatment
- Steam cleaning
- Carpet and upholstery extraction
- Full interior detailing
- Ozone odour treatment
- Thorough drying
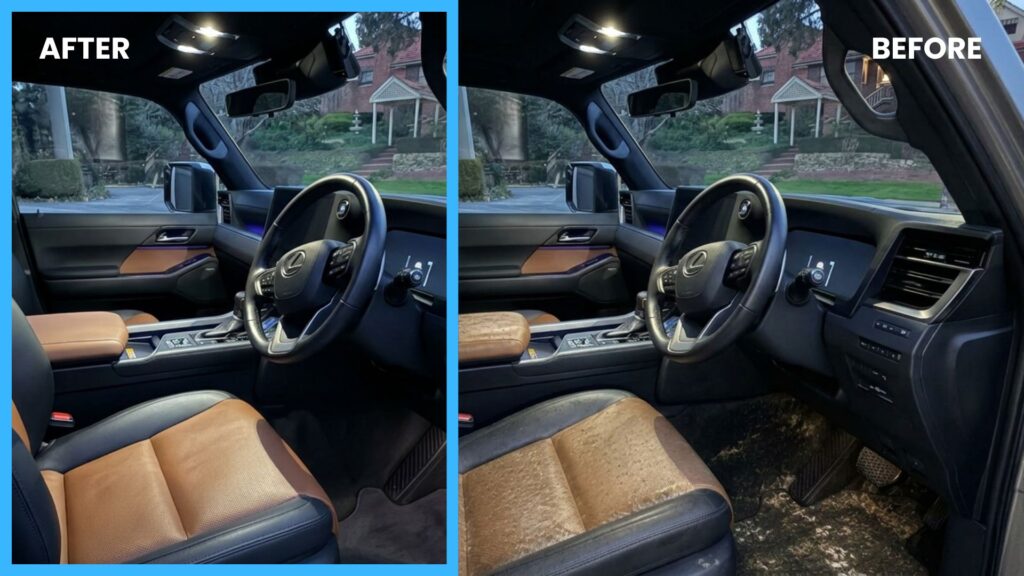
The vehicle was fully restored visually, and the strong musty odour was removed.
We have completed similarly severe mould jobs on vehicles including a Tesla, Ford Fiesta, Toyota Kluger and Toyota RAV4.
In these cases, mould was not limited to one seat. It had spread across large sections of the seats, carpets and interior trims.
These jobs show why a complete inspection matters. Cleaning only the first visible patch would not have solved the problem.
Can Every Mould-Affected Surface Be Restored?
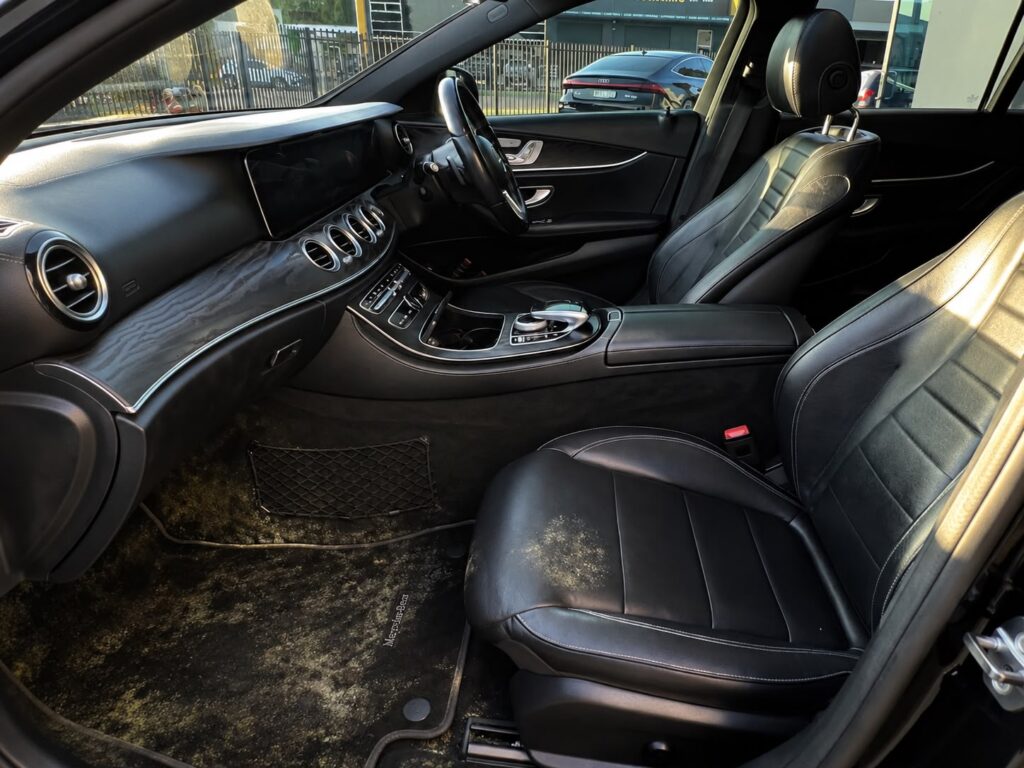
Many mould-affected seats, carpets and plastics can be restored or greatly improved.
However, not every material will always return to its original appearance.
Seat belts are the main example.
Seat belts are made from tightly woven fibres. Once mould staining enters the material, the belt may be cleaned but the original colour may not return completely.
In this situation, replacement may be the better option.
We prefer to be honest about this before starting the job rather than promising that every mark will disappear.
We have not normally needed to remove seats during our process. However, each vehicle is different, and severe moisture underneath fixed components may require further inspection by another automotive professional.
Why the Mould May Need to Be Treated Before a Mechanic Will Help
Some customers want to take the car directly to a mechanic, windscreen specialist or sunroof repairer.
However, when the interior is completely covered in mould, a technician may refuse to work inside the vehicle.
In these cases, the visible mould may need to be treated first.
Once the interior has been cleaned and the odour has been reduced, the car can be taken to the appropriate repairer to fix the roof leak, blocked drain, windscreen seal or other water-entry problem.
We provide a six-month workmanship guarantee on our mould-removal work, provided the original moisture source has been repaired.
The guarantee cannot cover new mould caused by an ongoing leak, another open window or new water entering the vehicle.
When Should You Hire a Professional?
Consider professional Mould Removal help when:
- Mould covers more than one small area
- Several seats are affected
- The carpet or underlay is wet
- The vehicle has a strong musty smell
- Mould is visible underneath the seats
- The roof lining is affected
- Seat belts are heavily stained
- The car was unused while damp
- DIY cleaning did not work
- The mould returned
- You cannot locate the moisture source
One customer considered getting rid of their vehicle after receiving a restoration quote of around $1,200.
The cost felt too high at first, so we offered a payment option through Afterpay. The customer decided to restore the car instead of disposing of it.
After the work was completed, they were surprised by how clean the interior looked.
We have not received a call from a customer telling us the mould returned after our treatment when the original moisture source had been properly repaired.
Why Melbourne Winter Creates More Mould Problems
June, July and August are normally our busiest months for mould-removal enquiries.
During Melbourne’s colder and wetter weather:
- Vehicles are regularly driven in rain
- Carpets take longer to dry
- Windows remain closed
- Cars receive less ventilation
- Roof and windscreen leaks become more noticeable
- Some vehicles remain unused for several days
Many of our jobs come from Melbourne’s south-eastern and eastern suburbs.
Areas where we have treated mould-affected vehicles include:
- St Kilda
- Hawthorn
- Malvern East
- Caulfield
- Balwyn
- Oakleigh
- Dandenong
- Frankston
- Pakenham
- Bundoora
- Doreen
These suburbs do not cause mould. They are simply areas where we have completed real customer jobs.
How to Stop Mould From Returning
After the interior has been treated:
- Repair roof, sunroof and windscreen leaks
- Check and clear blocked sunroof drains
- Repair damaged door seals
- Check the air-conditioning drain
- Remove wet mats and towels immediately
- Inspect the carpet after heavy rain
- Check the boot and spare-wheel compartment
- Ventilate the vehicle when safe
- Avoid leaving the car unused while damp
- Do not close the vehicle for long periods before the interior is dry
The most important step is acting early.
A small leak may initially affect only one section of carpet. If the vehicle remains closed, the moisture can spread through the cabin and mould may begin appearing on seats, seat belts, plastics and roof lining.
Final Advice From Our Experience
After four to five years of treating mould-affected vehicles, the biggest mistakes we see are waiting too long and relying on homemade cleaning tricks.
Vinegar, bleach and air fresheners may change the appearance or smell temporarily, but they do not repair a roof leak or remove water trapped underneath the carpet.
Start by finding the source of the moisture.
Inspect the full interior, including underneath the seats, floor mats and boot carpet. Make sure the affected surfaces are properly treated, extracted and dried.
When mould has spread across several surfaces, professional treatment may help save the interior and avoid more expensive replacement work.
For widespread mould, wet carpets or a strong musty odour, visit our Car Mould Removal Melbourne service page to view our process and request a quote.
Frequently Asked Questions
Can mould be completely removed from car seats?
Mould can often be removed from fabric and leather car seats. However, the result depends on how deeply it has entered the foam, stitching or perforated sections.
Can I use vinegar on mouldy car seats?
Vinegar is commonly recommended online, but it may leave a strong smell and may not be suitable for every interior surface. It also does not remove trapped water from underneath carpets or inside seat foam.
Can I use bleach on car upholstery?
Household bleach may fade coloured fabric, mark plastics or damage interior finishes. A suitable bleach-free product should be tested on a hidden area first.
How long does car mould removal take?
A larger mould-removal job normally takes around three to five hours. The exact time depends on the size of the vehicle, the amount of mould and the level of moisture inside the carpets and seats.
Why does mould keep returning inside my car?
Mould usually returns because the original leak was not repaired or the interior remained damp. Roof leaks, wet carpet underlay, blocked drains and damaged seals are common causes.
Does ozone treatment remove car mould?
Ozone treatment should not replace physical cleaning. It may be used after cleaning and extraction to help reduce stubborn odour. The vehicle must remain unoccupied during treatment and be ventilated afterwards.
Do mouldy seat belts need replacement?
Some mouldy seat belts can be cleaned, but permanent staining may remain inside the woven material. Replacement may be recommended when the original appearance cannot be restored or there are safety concerns.
Do you guarantee the mould will not return?
We provide a six-month workmanship guarantee when the original moisture source has been repaired. An ongoing or new water leak can cause mould to grow again.